Keep your normal photo mode for everyday use unless another mode repeatedly improves the photographs you keep. Try supported 48MP capture for static detail, substantial cropping or a larger output—and check whether the extra pixels make a useful difference.
That default may be 12MP or 24MP. This guide compares modes on the same phone and camera, rather than ranking different phones by their megapixel specifications.
Evidence disclosure: This is a research-based guide. FlawCheck has not conducted a matched 12MP/48MP camera test. The recommendations below are conditional starting points; numerical illustrations describe pixel geometry, not measured image-quality gains. Features vary by phone, camera, mode and software.
Quick answer: Which mode should you use?
Choose for the scene and the finished photograph. A setting that produces a larger file is worthwhile when it preserves information you use without making the capture or editing workflow inconvenient.
| Scene / output | Mode worth trying | Trade-off | How to verify |
|---|---|---|---|
| Everyday photos and simple sharing | Your convenient, proven default | Extra storage/workflow may give little visible benefit | Whether 48MP improves the actual shared result |
| Static fine detail in favorable light | Compare default with supported 48MP | More pixels do not guarantee useful texture | Useful texture at equal output size |
| A substantial crop or larger print | Try supported 48MP | Dimensions do not guarantee a sharp finished result | Detail in the final crop or print |
| A dim, stationary scene | Supported normal/night workflow first | Resolution alone does not predict night quality | Noise, texture, highlights and capture duration |
| Moving children or pets | The workflow that reliably captures the moment | Focus, exposure and timing can vary by mode | Repeated focus, blur and timing results |
| Rapid sequences | The mode proven ready for the next shot | Processing time differs from next-shot readiness | Responsiveness during a short sequence |
| A photo you plan to edit carefully | Choose format and resolution separately | Format can change editing demands and file size | Editing benefit, storage and compatibility |
These are checks to perform, rather than tested winners. If your default already gives you the result you want, there is little reason to change it simply because a higher number is available.
What changes when you switch from 12MP to 48MP?
An idealized 12MP image might contain 4000 × 3000 pixels; an idealized 48MP image might contain 8000 × 6000. At the same aspect ratio, that is four times the total pixels and twice the count along each dimension. These grids are illustrations, not promised dimensions from a particular phone.
Useful detail is a separate question. The lens, focus, exposure and processing determine what information survives in those pixels. Edmund Optics’ resolution reference explains how sensor sampling and optical resolution contribute to an imaging system.
Our phone camera specifications guide explains those factors together if you need the broader context before comparing modes.
Switching modes can also change the capture pipeline. Even a comparison using the same file format evaluates the two complete modes, including their exposure and processing choices. It does not isolate the pixel count from everything else.
For binning, sensor resolution and saved-image resolution, see phone camera megapixels explained. Here, the practical question is whether another mode gives you a better photograph for your intended use.
When 48MP is worth trying
Start with a stationary scene containing detail you might actually use: architecture, fabric, a landscape or lettering. Favorable light and dependable focus give you a useful opportunity to compare modes without movement dominating the result.
Suppose you photograph a building and later want a tighter composition around a window. Extra useful information can help that crop. But if the larger file contains smeared texture or missed focus, its dimensions alone will not rescue it.
Take several photographs in each mode, keeping the camera and framing consistent. Look at the intended final crop, then inspect the center and edges. Ask whether recognizable features survive more clearly, rather than whether sharpening makes edges look stronger.
Check the workflow too. Can you take another shot promptly? Are the features you need still available? Do the actual files justify their storage cost? Keep 48MP for situations where the answer is consistently useful; you do not have to make it your permanent default.

When the default mode is the better starting point
For an expression, a pet jumping or an event you cannot repeat, start with the workflow you already trust. This is an editorial priority: getting a usable photograph of the intended moment matters more than selecting a maximum-resolution label.
That does not establish that every default mode is faster or every 48MP mode misses action. Behavior depends on the implementation. Samsung’s February 2023 S23 Ultra support page documents possible longer intervals when taking high-resolution photos. Its 50MP/200MP example illustrates a trade-off, not a timing result for 48MP phones.
Try a short sequence before an important event. Separate three observations: whether the photograph shows the moment you intended, when the finished image becomes available, and when the camera accepts another shot. A processing indicator does not measure all three.
Apple’s capture-development session distinguishes capture and processing, and describes ways apps can overlap work. That is why processing duration alone cannot establish shutter lag or next-shot readiness in your camera app.
Low light and motion: Why resolution alone cannot decide
A dim building and a moving child indoors pose different problems. The building can remain stationary while the camera collects information. The child can move during an exposure or between frames.
Google’s original Night Sight explanation describes choosing exposure times according to movement, including an early Pixel example with a moving dog. It also distinguishes camera shake from subject movement: stabilization does not freeze the subject.
For a stationary night scene, begin by comparing the supported normal/night workflow with any high-resolution option you want to use. Inspect noise, texture and bright areas at the same output size. Do not judge one image only through a much more enlarged native-pixel view.
For movement, include failed attempts. Check whether eyes or faces are in focus, whether motion is blurred and whether the expression is the one you intended. One successful frame proves less about reliability than a repeated sequence.
Multi-frame processing is not automatically defeated by movement. Google’s handheld super-resolution research describes handling changing scenes. Its mechanism is not proof of perfect behavior on every phone, but it rules out simplistic advice that more processing always ruins action.
The useful decision is therefore specific to the scene and mode. See phone camera sensor size explained for the separate question of capture area and light-gathering potential.
Cropping, printing and sharing
Crop for the composition you need
An idealized crop retaining half the width and half the height keeps one quarter of the pixels. Before resampling, the arithmetic is:
| Starting image | Pixels remaining after a 2× linear crop |
|---|---|
| 12MP | 3MP |
| 24MP | 6MP |
| 48MP | 12MP |
This calculation explains potential room to crop. It does not establish the sharpness of those remaining pixels or equivalence to a camera’s capture-time 2× setting. Read optical-quality zoom versus optical zoom for that separate capture-path question.

Match resolution to the finished print
For a chosen print density of 300 pixels per inch, 4000 × 3000 pixels corresponds to about 13.3 × 10 inches; 8000 × 6000 corresponds to about 26.7 × 20 inches. Divide each pixel dimension by the selected PPI to reproduce the calculation.
Those are geometric examples. They do not promise a sharp print, and 300 PPI is not a universal requirement. Consider the crop, source detail, print size and viewing distance together. For an important print, inspect a sample at the intended size before assuming the larger file solves the problem.
Inspect the actual shared result
Send or export both photographs through your normal workflow, then inspect the resulting files. Judge whether the difference matters in the photograph people receive. Avoid deciding from a gallery crop alone or assuming every sharing service handles resolution identically.
48MP HEIF/JPEG versus 48MP RAW
Resolution and file format answer different questions. Resolution describes the output grid. Format affects the stored information and editing workflow. Supported high-resolution capture can use processed formats: Apple’s iPhone 15 specifications list 24MP/48MP main-camera support and HEIF/JPEG capture.
For a practical mode choice, compare 12MP HEIF with 48MP HEIF, or JPEG with JPEG, where supported. Compare 12MP and 48MP ProRAW separately using the same development and export settings. A 12MP JPEG versus 48MP ProRAW comparison changes more than resolution.
Apple explains that ProRAW combines RAW-format information with iPhone processing. It provides editing flexibility rather than an untouched sensor file. Choose it when you intend to use that flexibility and accept the extra workflow.
Once you have chosen the output resolution, use our RAW vs JPEG/HEIF format guide to decide whether the additional editing workflow suits the photograph.
The same support page, published in April 2024, estimates approximately 25MB for 12MP ProRAW and 75MB for 48MP ProRAW. These are historical manufacturer estimates, not our measurements or normal HEIF/JPEG sizes. Check your own files instead of applying a universal multiplier.
If your concern is harsh texture or unnatural rendering, our overprocessed iPhone photos guide addresses the controls and workflow choices. More pixels alone do not identify the cause.
What if your phone defaults to 24MP?
Include 24MP in the comparison. You do not need to switch to 12MP simply to fit a two-mode comparison.
Apple’s advanced camera settings guide describes changing the Main/Fusion default from 24MP to 12MP on supported models. It also identifies the resolution controls used for 48MP. Check your model and software before following a menu recipe.
Treat the modes as separate choices. Apple’s high-resolution capture session describes a specific 24MP pathway combining a fused lower-resolution image with high-resolution information. That implementation should not be reduced to a universal claim that 24MP is merely a smaller saved 48MP image.
Compare 24MP and 48MP in your usual scenes and format. Retain the mode that delivers the output you want with acceptable capture, storage and editing costs.
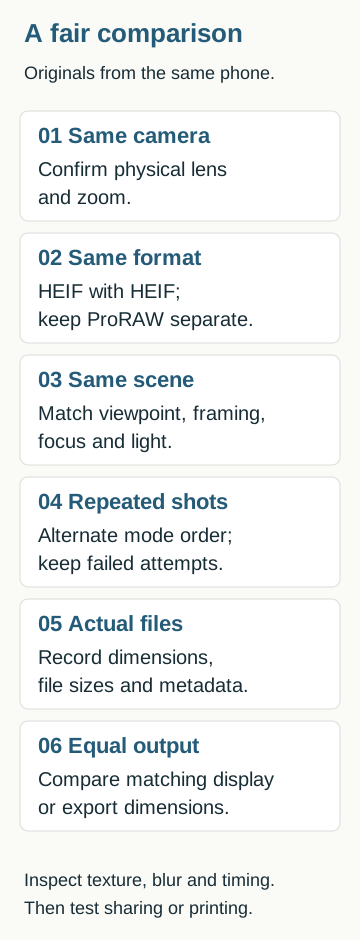
A repeatable comparison you can do yourself
Use four scene types: static detail in favorable light, a dim stationary scene, repeatable movement, and fine detail beside a bright area.
- Keep the setup consistent. Clean the lens, use the same camera, viewpoint, framing and aspect ratio, and focus on the same subject. Note night mode, flash, styles and exposure adjustments.
- Compare like formats. Keep HEIF, JPEG and ProRAW comparisons separate. Include 24MP when it is a supported option you normally use.
- Repeat and change the order. Try several matched sets, taking the normal mode first in some and high resolution first in others. Note changing light or motion; keep unsuccessful attempts.
- Check the saved files. Record actual dimensions and file sizes. Keep originals, and note model/software. Exposure metadata may describe one frame rather than the complete multi-frame capture window.
- Compare equal output sizes first. Use the same viewer and rendering settings. Then crop the same scene region and export at matching dimensions with the same resizing method.
- Judge the finished photograph. Inspect focus, motion, texture, highlights and noise together, then run your actual sharing or printing workflow. Check that another shot remains practical.
Native-pixel inspection can help diagnose problems, but it shows a different amount of the scene when files have different resolutions. Corresponding crops at equal final size answer your practical question more directly.
Comparison caution: A 12MP JPEG versus 48MP ProRAW comparison changes both resolution and format. Test each format separately, and confirm the actual saved dimensions before attributing a difference to megapixels.
Write down a simple decision: “Use 48MP for this crop” or “Keep the default for indoor movement.” You can choose differently for different situations.
Verdict
Keep a dependable default for ordinary photographs. Try supported 48MP when static detail, a planned crop or a larger output gives the extra resolution a purpose. If your default is 24MP, include it directly in that decision.
Change your routine when repeated results justify it. A larger file that does not improve your finished photograph—or a demanding editing workflow you rarely complete—offers little practical benefit.